
Privacy Hedge Installation Example for Long Island
See a privacy hedge installation example tailored to Long Island yards, with spacing, plant choices, drainage tips, and care for a fuller living screen.
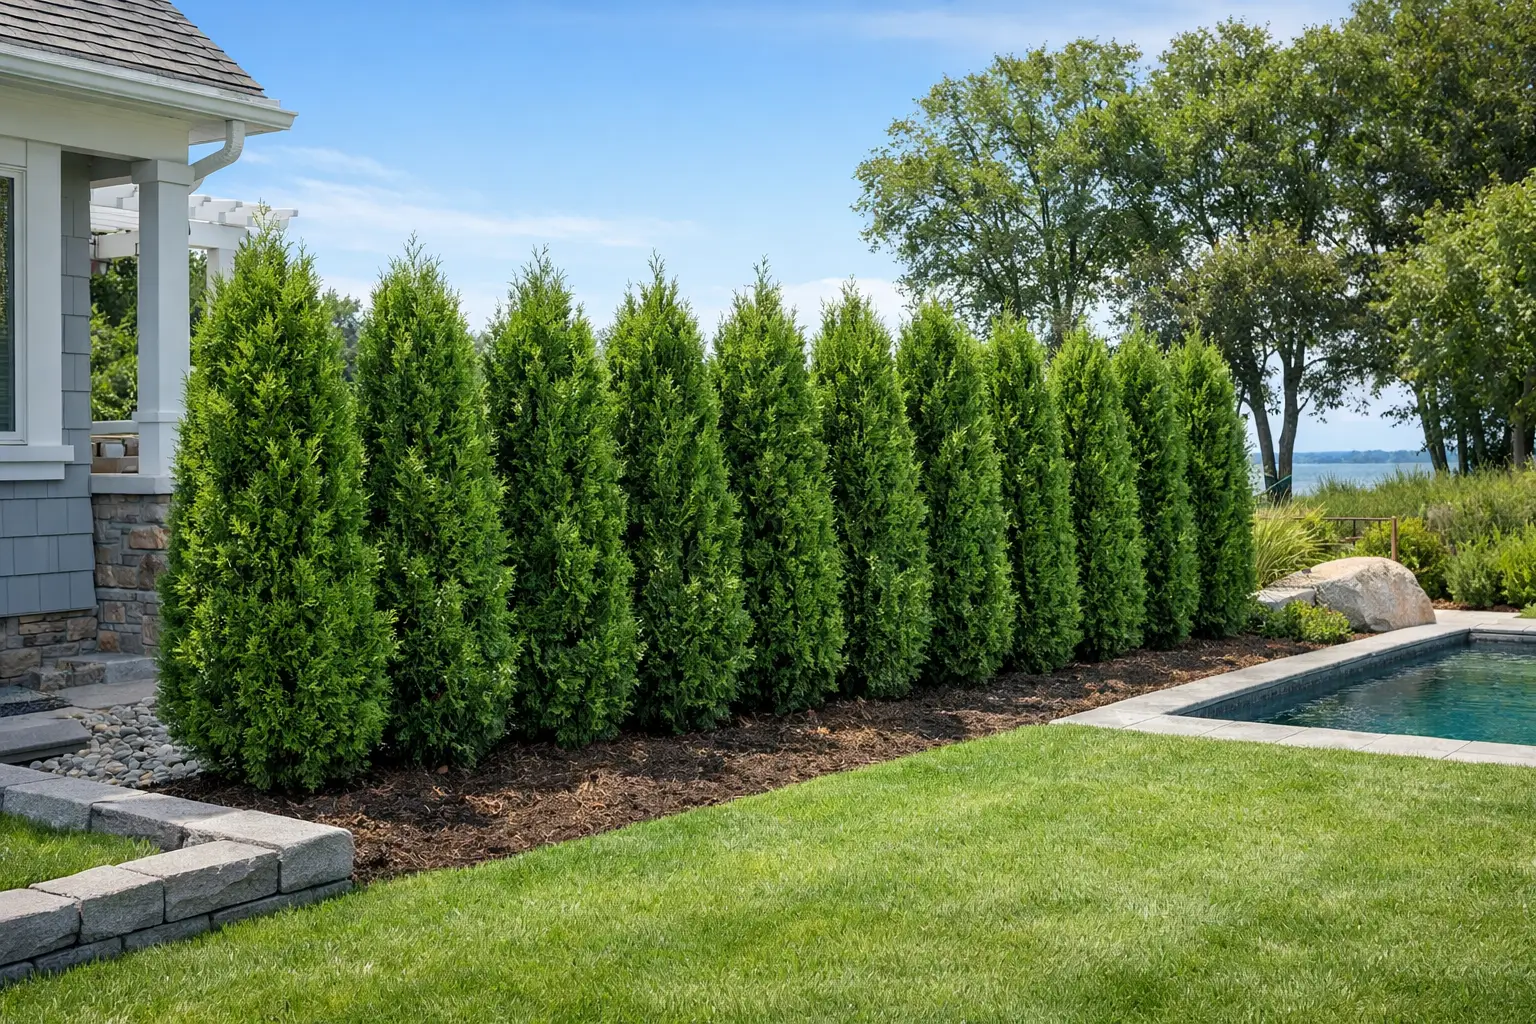
A fence can define a property line, but a well-planted hedge changes how a yard feels. This privacy hedge installation example shows how a Nassau County homeowner can turn an exposed patio or side yard into a greener, more comfortable outdoor space with the right plants, spacing, and early care.
For Long Island properties, the goal is usually not simply to plant a row and wait. Homeowners want screening that looks good from the street, holds up through winter, suits the available sunlight, and does not overwhelm a modest suburban yard in a few years. That is where planning makes the difference between a hedge that fills in beautifully and one that becomes thin, crowded, or difficult to maintain.
A privacy hedge installation example for a typical yard
Imagine a 52-foot property line beside a backyard patio. The neighboring home has second-story windows looking toward the seating area, while the planting strip is about 7 feet deep and receives six or more hours of sun. The homeowner wants year-round coverage without sacrificing the lawn or creating a wall that is too wide for the space.
For this setting, Green Giant arborvitae is a strong option when there is adequate depth and room for mature growth. A row of 10 to 12 plants, depending on the selected size and final spacing, can create a substantial evergreen screen. Placing plants roughly 5 to 6 feet on center allows them to grow together while giving each root system enough room to establish.
The installation begins with a gently curved bed rather than a perfectly straight trench. A slight curve looks more natural from the patio and gives the landscape a designed appearance. The bed is widened to about 6 feet, with mulch extending beyond each plant's root ball. This keeps mowers away from trunks, simplifies watering, and gives the roots a healthier zone to expand.
The plants are set so the top of each root ball sits level with, or slightly above, the surrounding soil. Planting too deeply is one of the most common reasons new evergreens struggle. Soil is backfilled firmly but not packed hard, then each plant receives a deep watering to settle soil around the roots.
A 2- to 3-inch layer of mulch finishes the bed. Keep mulch a few inches away from each trunk. Mulch piled against stems can hold excess moisture and invite problems that are easily avoided.
Start with the right hedge for the space
The best screening plant is not always the tallest one available. It needs to match the sunlight, soil conditions, desired height, and depth of the planting area. Long Island yards often have limited side-yard space, deer pressure, varying drainage, and close views from neighboring properties. Those details should guide the choice.
Arborvitae for classic evergreen screening
Arborvitae remains a favorite for privacy because it offers dense, evergreen foliage and a clean, upright look. Green Giant arborvitae grows quickly and is well suited to larger yards where a tall screen is desired. It needs room, however. Mature plants can become broad, so tight spacing may look full at first but leads to competition later.
For narrower spaces, other arborvitae selections may be a better fit. The right variety can provide dependable coverage without pushing too far into a walkway, driveway, or patio. A nursery professional can help match the mature width to the actual bed, not just the empty space visible on planting day.
Leyland cypress for fast coverage
Leyland cypress can provide a fast-growing evergreen screen in sunny locations. It has a softer texture than arborvitae and can make a large property line feel enclosed sooner. The trade-off is its size and maintenance needs. It needs thoughtful spacing, enough airflow, and a homeowner prepared to manage its eventual height.
This choice works best when there is plenty of room to let the plants develop rather than forcing them into a narrow strip. If the bed is shallow or the house next door is very close, a more compact plant may be the smarter long-term decision.
Skip laurel for a broadleaf look
Skip laurel offers glossy green leaves and a fuller, more traditional hedge appearance. It is a useful choice for homeowners who want screening at eye level around a patio, pool area, or front property line without the formal look of a conifer row. It can also handle some shade better than many evergreen screening trees.
Laurels tend to form a wider hedge, so they need adequate depth. They are especially attractive when planted in a staggered layout, which creates density while keeping the planting from looking overly rigid.
Spacing is where privacy begins
A hedge planted too far apart can leave frustrating gaps for years. A hedge planted too close together may look impressive immediately, then decline as plants compete for water, nutrients, and light. The correct distance depends on the plant variety, the size purchased, and whether the hedge will be sheared or allowed to keep its natural shape.
For a single row of arborvitae, measure from the center of one plant to the center of the next. That measurement is called on-center spacing. Green Giants often need 5 to 6 feet on center for a balanced screen, while narrower varieties can be installed closer. Skip laurels may be spaced about 3 to 5 feet apart, depending on container size and how quickly a continuous hedge is needed.
A staggered double row creates a more immediate screen, but it requires a deeper bed and more plants. It is often worth considering for a wide backyard boundary where privacy is the priority and there is enough space to avoid crowding. On a narrow side yard, one properly spaced row is usually the better solution.
Before digging, mark each location with stakes or nursery pots. Step back from the street, patio, and key windows to check the sight line. Small adjustments on paper or with markers are much easier than moving a heavy root ball after planting.
Prepare the bed before plants arrive
Healthy privacy hedges start below ground. Remove grass, weeds, construction debris, and old roots from the planting area. Long Island soils can vary block by block, from sandy ground that drains quickly to heavier soil that holds water after a storm.
Test drainage with a simple hole test if the area stays wet. Fill a hole with water and observe how quickly it drains. If water lingers for a long time, the bed may need grading changes, improved drainage, or a plant choice that tolerates wetter conditions. Evergreens generally do not appreciate roots sitting in standing water.
Amending the entire bed with quality organic material can improve soil structure, especially in compacted areas. Avoid creating an overly rich pocket only inside each planting hole. Roots are more likely to spread outward when the surrounding soil is prepared consistently.
Call for utility marking before any excavation. This is particularly important along property lines, where cable, irrigation, lighting, or other buried services may be present. Also confirm the boundary before setting the hedge. A mature evergreen should not become a future disagreement over space.
Give new hedges a strong first season
Even large, healthy plants need regular attention after installation. The first growing season determines how quickly roots establish and how well the hedge handles winter, heat, and dry stretches.
Water deeply and slowly at the root zone instead of giving the foliage a quick daily spray. Newly installed hedges commonly need consistent watering several times each week during dry weather, though the schedule should change with rainfall, soil type, and temperature. Sandy soil may need water more often than heavier soil. Check moisture a few inches below the surface before watering again.
Mulch helps conserve moisture and keeps the bed tidy, but it is not a substitute for watering. Keep an eye out for browning, drooping, or unusually pale foliage. These symptoms can point to water stress, drainage trouble, transplant shock, or pest issues. Addressing them early is far easier than trying to revive a struggling row months later.
Pruning should be light at first. Remove broken branches and shape only as needed to keep a clean outline. Avoid aggressive trimming of newly planted hedges. Let them direct energy toward root development before asking them to produce a tightly clipped form.
Make the hedge part of the whole landscape
A privacy screen looks more polished when it is framed by the rest of the yard. A simple layer of lower shrubs, ornamental grasses, perennials, or seasonal color in front of the hedge adds depth and softens the transition from lawn to evergreen wall. The planting should still leave enough open soil and air circulation around the hedge base.
Lighting can make the space more useful after sunset, especially near patios and walkways. Low landscape lighting aimed carefully at the bed adds texture without shining into neighboring windows. In front yards, a well-designed hedge can also strengthen curb appeal while helping define an entry or soften a driveway edge.
For homeowners who want plant selection, delivery, and professional installation coordinated in one place, Westminster Nursery can help shape a privacy plan around the conditions of your actual property. The right screen is not just about buying more plants. It is about choosing plants that will still fit, fill in, and look good years from now.
Take a few photos of the area, measure the planting strip, and note how much sun it receives before you shop. Those simple details make it much easier to choose a hedge that gives your family the privacy you want and a landscape you will enjoy looking at every day.