
Why Are Evergreens Turning Brown on Long Island?
Evergreens turning brown can signal winter burn, thirsty roots, pests, or drainage trouble. Learn what Long Island homeowners can do to help them recover now.
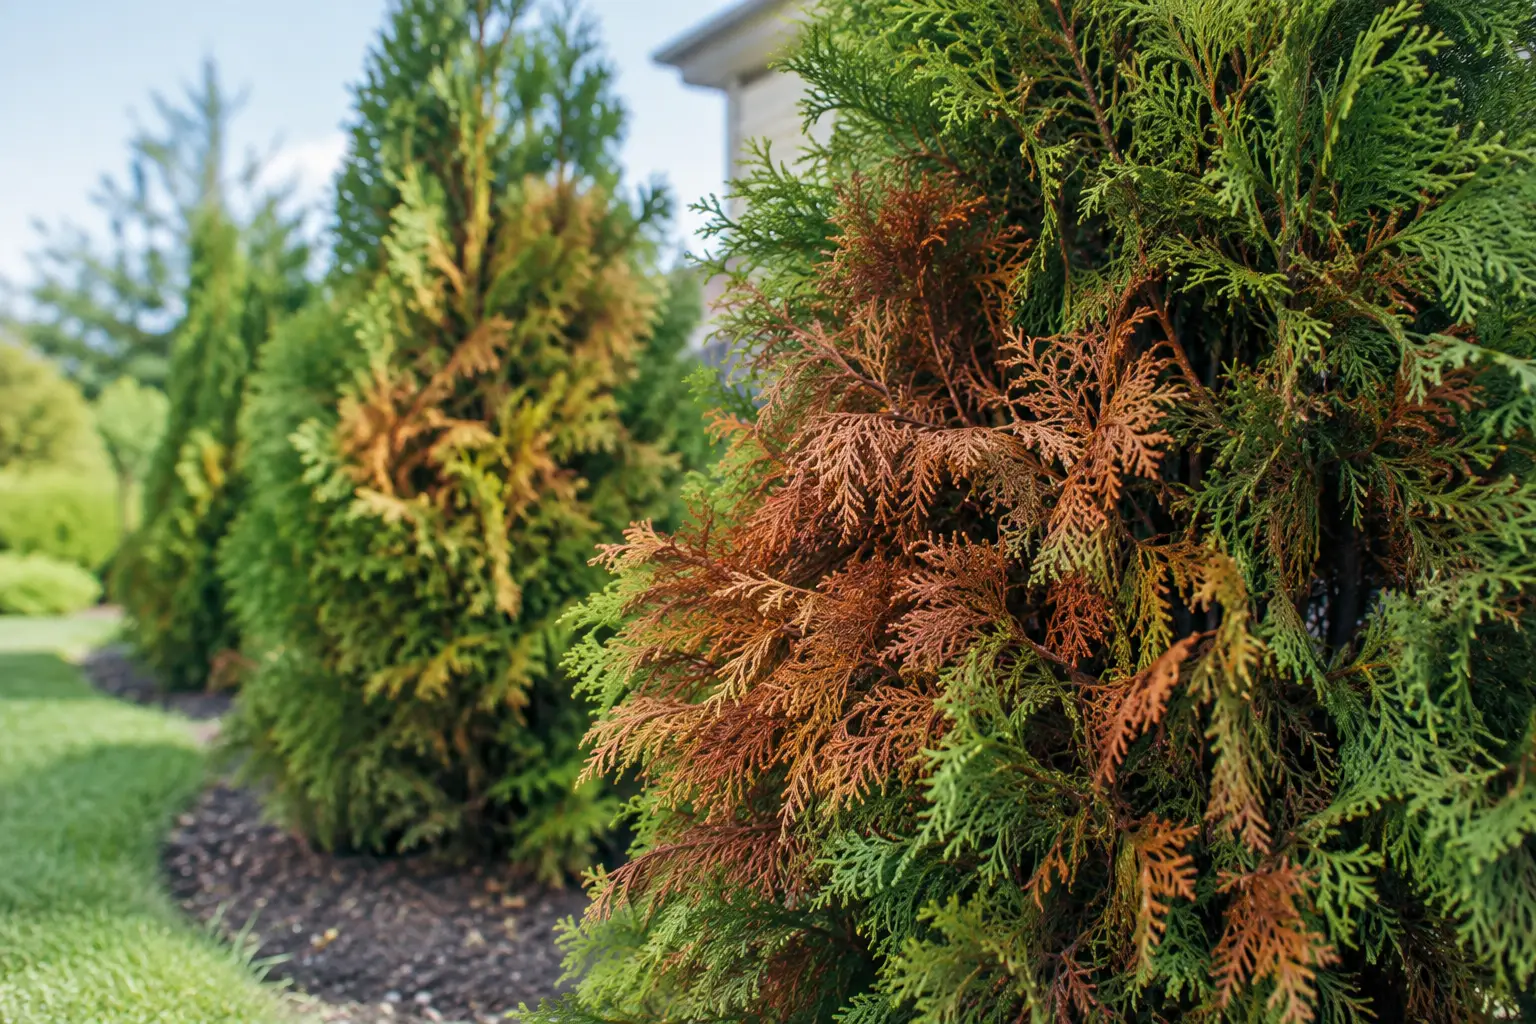
A row of arborvitaes can look perfectly healthy in October, then show bronze tips or patchy brown branches after a tough Long Island winter. Evergreens turning brown are a common concern for homeowners, especially when a privacy screen, foundation planting, or favorite specimen tree suddenly loses its rich green color. The good news is that brown foliage does not always mean the plant is gone. The key is figuring out where the browning started, when it appeared, and whether the stems beneath it are still alive.
First, Look Closely at the Brown Areas
Before pruning or replacing anything, inspect the pattern. Healthy evergreen foliage should feel flexible and hold onto its needles or scales. Gently scratch a small section of bark on a twig with your fingernail. Green tissue beneath the bark is a promising sign that the branch is alive. Dry, tan tissue all the way through usually means that section has died back.
Browning only on the inside of an arborvitae, spruce, or pine can be normal seasonal needle drop. Older interior growth receives less light, then sheds as the plant redirects energy to newer outer growth. This often happens in fall and can look alarming until you look at the green branch tips surrounding it.
Browning at the outer tips, on one exposed side, or throughout an entire plant calls for a closer diagnosis. A newly planted Green Giant arborvitae and an established blue spruce do not always react to stress in the same way, so plant type and planting history matter.
The Most Common Reasons Evergreens Turn Brown
Winter burn and wind exposure
Evergreens continue to lose moisture through their needles and foliage during winter. When the ground is frozen, roots cannot pull in enough water to replace it. Bright winter sun and strong wind make the problem worse, particularly on the south and west sides of a plant.
Winter burn often appears in late winter or early spring as bronze, rust-colored, or brown outer foliage. Arborvitaes, boxwoods, broadleaf evergreens, and young privacy hedges are frequent victims. Damage may look dramatic in March, but wait for spring growth before making major cuts. Some foliage can recover in appearance as new growth fills in, while truly dead tips may need light pruning.
Dry soil, even after winter ends
A brown evergreen is not always suffering from too much water. Long Island can have stretches of dry, windy weather in spring, summer, and fall, and shallow-rooted evergreens dry out quickly. New plantings are especially vulnerable because their roots have not yet extended beyond the original root ball.
Check the soil several inches down near the root zone. If it is dry and crumbly, water slowly and deeply rather than giving the foliage a quick spray. The goal is moisture around the roots, not wet branches. A 2- to 3-inch layer of mulch helps retain soil moisture and moderate temperature swings, but keep mulch several inches away from the trunk.
Poor drainage and root stress
The opposite issue can create nearly identical symptoms. Constantly wet soil pushes oxygen out of the root zone, causing roots to weaken or rot. Browning may begin lower on the plant, and foliage can look dull, pale, or limp before it turns brown.
This is common where downspouts discharge near a hedge, where compacted soil holds water, or where a planting bed sits lower than the surrounding lawn. If the soil remains soggy for days after rain, adding more water or fertilizer will not solve the problem. Drainage needs to be corrected, and severely stressed plants may require replacement with varieties better suited to the site.
Planting depth and crowded root balls
Evergreens planted too deeply often decline slowly. The trunk flare should sit at or slightly above the surrounding soil level, not buried beneath mulch or compacted soil. A root ball wrapped in burlap, wire, or synthetic material that was not properly addressed at planting can also restrict root development.
A hedge planted too tightly may look lush right away, but crowding eventually reduces airflow, light penetration, and room for roots. This is one reason spacing matters when building a long-lasting privacy screen. A dense look is desirable, but each plant still needs enough room to establish and mature.
Pests and disease
Tiny pests can cause big visual changes. Spider mites are more likely during hot, dry conditions and may leave foliage stippled, faded, or bronzed. Bagworms can strip sections of arborvitae and other evergreens. Scale insects, borers, and certain fungal diseases may also cause branch dieback.
Look for webbing, small bags hanging from branches, unusual bumps, sticky residue, or browning that begins in isolated patches. Bring a sample in a sealed bag if possible, including healthy and affected foliage. A clear diagnosis prevents treating for the wrong problem and gives your plant a better chance of recovery.
What to Do Before You Prune
It is tempting to shear away every brown section immediately. With arborvitae and many needled evergreens, that can leave permanent bare spots because older wood may not produce new green growth. Start by removing only branches that are fully brown and brittle all the way back to healthy green tissue.
Do not heavily fertilize a stressed evergreen. Fertilizer cannot revive dead roots, and pushing tender growth can make an already stressed plant work harder. First correct the underlying issue: watering, drainage, mulch depth, pest pressure, or exposure. Once the plant is actively growing and conditions are stable, a plant professional can advise whether feeding is appropriate.
For a privacy hedge, inspect every plant rather than assuming the first brown one is the only issue. A pattern across the row can point to a shared cause, such as irrigation coverage, drainage, road salt, or winter wind. One damaged plant in an otherwise healthy row may indicate a localized root or pest problem.
A Practical Recovery Plan
If the stems still show green beneath the bark and the roots are not sitting in standing water, give the plant time and consistent care. Use this simple approach through the growing season:
- Water deeply when the root zone begins to dry, especially during the first year after planting.
- Keep mulch at a moderate depth and clear of trunks and main stems.
- Remove fully dead branches with clean, sharp pruners, but avoid cutting back into bare old wood.
- Watch for new buds, fresh tip growth, pests, and changes in the spread of browning.
New growth is the real measure of recovery. A plant may retain some damaged foliage for a while, but healthy buds and flexible green stems show that it is still functioning. If browning keeps advancing after watering and weather conditions improve, it is time to investigate roots, insects, disease, or site conditions more closely.
When Replacement Makes More Sense
Sometimes replacement is the better investment, especially if more than half the plant is brown, branches snap easily throughout the canopy, or the root system has failed. Before choosing another evergreen, revisit the original site. Does the area receive harsh winter wind? Does water collect there? Is the hedge exposed to salt spray from a driveway or street? Has a larger tree begun shading the area?
Matching the plant to the site matters as much as choosing a handsome specimen. Arborvitaes, Green Giants, Leyland cypress, skip laurels, spruce, and other screening plants all have different needs for sun, moisture, spacing, and long-term size. The right choice creates a fuller, healthier screen with less corrective work later.
For Nassau County properties, Westminster Nursery can help homeowners assess brown evergreens, select suitable replacement trees or shrubs, and plan privacy planting that fits the property instead of fighting it. Bring clear photos and a branch sample when practical, then give the plant the care its condition calls for. A little patience now can save a favorite evergreen, and a smart site adjustment can protect the next one for years.